Should You Try Pumpkin Carving?
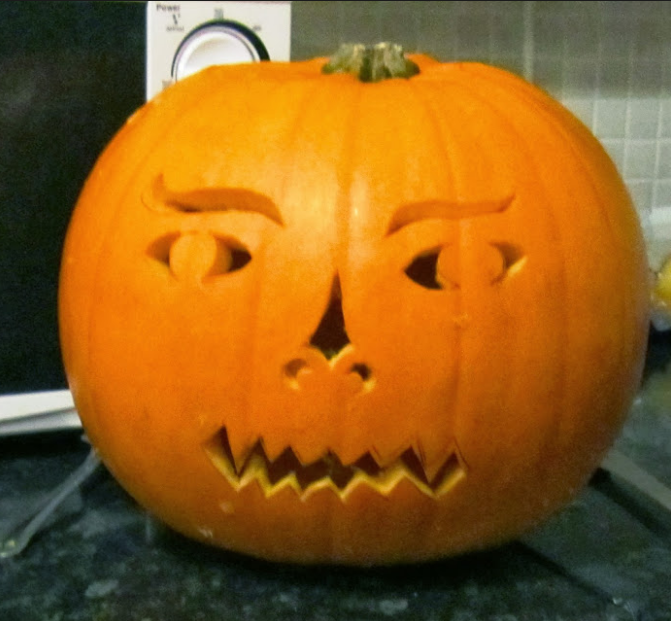
Picture by Matthew Chartier
Pumpkin carving is a simple and festive way to celebrate the arrival of autumn and a great way to start off Halloween decorations. I decided to try it for the first time and share my experiences with the readers of the Ubiquity in hopes of getting other students at Quartz Hill to have results much better than mine. In my most professional manner, I will explain the careful procedure I took, step-by-step, of the creation of a Jack O’Lantern.
The pumpkin of my choosing was found at Target, which sold them for 6 dollars each. My pumpkin, oddly, was nearly symmetrical with little surface imperfections, and it was soon to be the perfect model for my dashingly handsome and lavish Jack O’Lantern. I prepared my selection of tools to be sufficient for carving: a large spoon, a sharp utility knife, and a smaller knife. I began carving the pumpkin by tracing the lid with a dry erase marker and cutting around the outline of the lid with my utility knife, making sure to create a cone-shaped lid to prevent it from falling into the pumpkin carving when finished.
Next, I removed the strings and seeds with my hands and scraped the walls of the pumpkin with the spoon. I had decided to save the seeds, as my dreadful sister had begged me to make roasted pumpkin seeds with the leftover seeds. I continued to finish gutting out the pumpkin and made sure not to thin out the walls too much. With a dry erase marker, I outlined the face of my Jack O’Lantern, paying close attention to the eyebrows and symmetrical details.
I began the carving by sticking to the markings I made for the face. My stencils were available for the pumpkin carving, and I traced the outline with my smaller knife, making only the miniscule cuts and incisions. Then, I carved out circles for the eyes and the made crescents for the outline of the nose. Using my broader knife, I carved out the largest parts, including the eyebrows, the larger part and bridge of the nose, and the mouth. I finally finished off the details with the smaller knife, taking my time to make it equally proportioned and making sure to take the eyebrows and nose details in consideration.
The carving took me about one hour and the entire process took me about two and a half hours. My result came out alright, as it was much harder than I had initially thought it would be. Hopefully the students of QHHS can create a better Jack O’Lantern, one more dashing and exquisite than my own. Good Luck!

Hey it's me, Mattie C. I'm easily the best in the images department. I often take out my complaints about the other images with the copy editor. I basically...